Socky the Moogle (![[personal profile]](https://www.dreamwidth.org/img/silk/identity/user.png) sockymcsockerson) wrote2012-06-12 01:09 am
sockymcsockerson) wrote2012-06-12 01:09 am
[ html basics ]
Hey, it's been a while!
A friend of mine mentioned the other day that one function which seems less supported in DW comments than it was in Livejournal is Rich Text commenting. I'd never really used it myself, but I get that making the switch to Dreamwidth might be a problem there for people who are more used to Livejournal in that sense. Also, there are a few html commands in Dreamwidth that are different from those in Livejournal, and I'll cover that too.
As such, the basic point to this tutorial is to provide a quick and dirty guide to HTML for Dreamwidth purposes that should cover most everything you need to do normally. Nothing too fancy here, just straightforward stuff.
Bold, Underline, Italic
Colours and Special Effects
Embedding and Linking Things
Dreamwidth Specific HTML
Extra
If anyone's got questions, just leave a comment! I know I didn't go into very much, and a lot of this should be fairly common knowledge already, but it might not be for everyone.
Also, if you're interested in any of my other tutorials, I've got a master list here! So far, I've covered changing the default site style, getting into roleplaying, marking 'new' comments in a post, using LJ juggler or LJ login for managing multiple accounts, as well as getting and claiming your OpenID and uploading icons onto it.
(Quick and unrelated note! For people who are using Firefox or Chrome, check SpeedyFox out. It's meant to improve the speed and functionality of your browser. It seems to work okay for me- I haven't noticed a drastic improvement, but it doesn't seem slower or anything, and other people who use it have reported really good boosts in performance, so it might be worth a try.)
(original here)
A friend of mine mentioned the other day that one function which seems less supported in DW comments than it was in Livejournal is Rich Text commenting. I'd never really used it myself, but I get that making the switch to Dreamwidth might be a problem there for people who are more used to Livejournal in that sense. Also, there are a few html commands in Dreamwidth that are different from those in Livejournal, and I'll cover that too.
As such, the basic point to this tutorial is to provide a quick and dirty guide to HTML for Dreamwidth purposes that should cover most everything you need to do normally. Nothing too fancy here, just straightforward stuff.
Bold, Underline, Italic
Pretty sure everyone knows this, but it's the standard stuff. <b>, <i>, <u>, they're probably the first few tags people learn.
Usually what people don't know or aren't aware of, though, would be the <strong> and <em> tags. Putting text between <strong> tags makes it look bolded, and between <em> tags would make it look italicised.
So- why bother with these tags when they don't make a difference to how words look (and have more characters)? It's pretty simple- they change how things SOUND, which can be pretty important for people who use screen readers. <strong> and <em> add enunciation to the text; for instance, words between <strong> tags would be stressed aloud by the screen reader software, while words in bold would show up but not have the same heavy emphasis when read out.
Does this mean <b> and <i> tags don't have a use, though? Not necessarily! Say you work for some kind of company which italicises part its name- let's call it TeamRocket or something, like that. It'd be pronounced as 'Team Rocket', though, you wouldn't want any emphasis on either of the words, so that'd be where the <i> tag would come in handy.
The <u> tag is usually good to go, though! As is the <s> tag, which produces astrikethrougheffect.
Colours and Special Effects
Black and white too boring for you? We can fix that!
You're going to have to bring out the <font> tag here, though. But honestly, <font> is one of my favourite tags because you can kind of do so much with it. This is where you control the size, colour, face and style of your text. Doing so is simple:
<font size="YOUR NUMBER HERE"> to control size. 1 pt font looks like this, 2 like so, 3 gets larger, and so on. Take note, though, this doesn't work on Dreamwidth profiles and their default comment pages. For those, you'd be limited to <big> and <small>, which work... well, exactly like how they read.
So if you're looking at this from the comment page, you'll probably also notice that the sections which are supposed to have increasing font... don't. If you go to my journal itself and expand the cut entry from there, though, it'll look like the following:
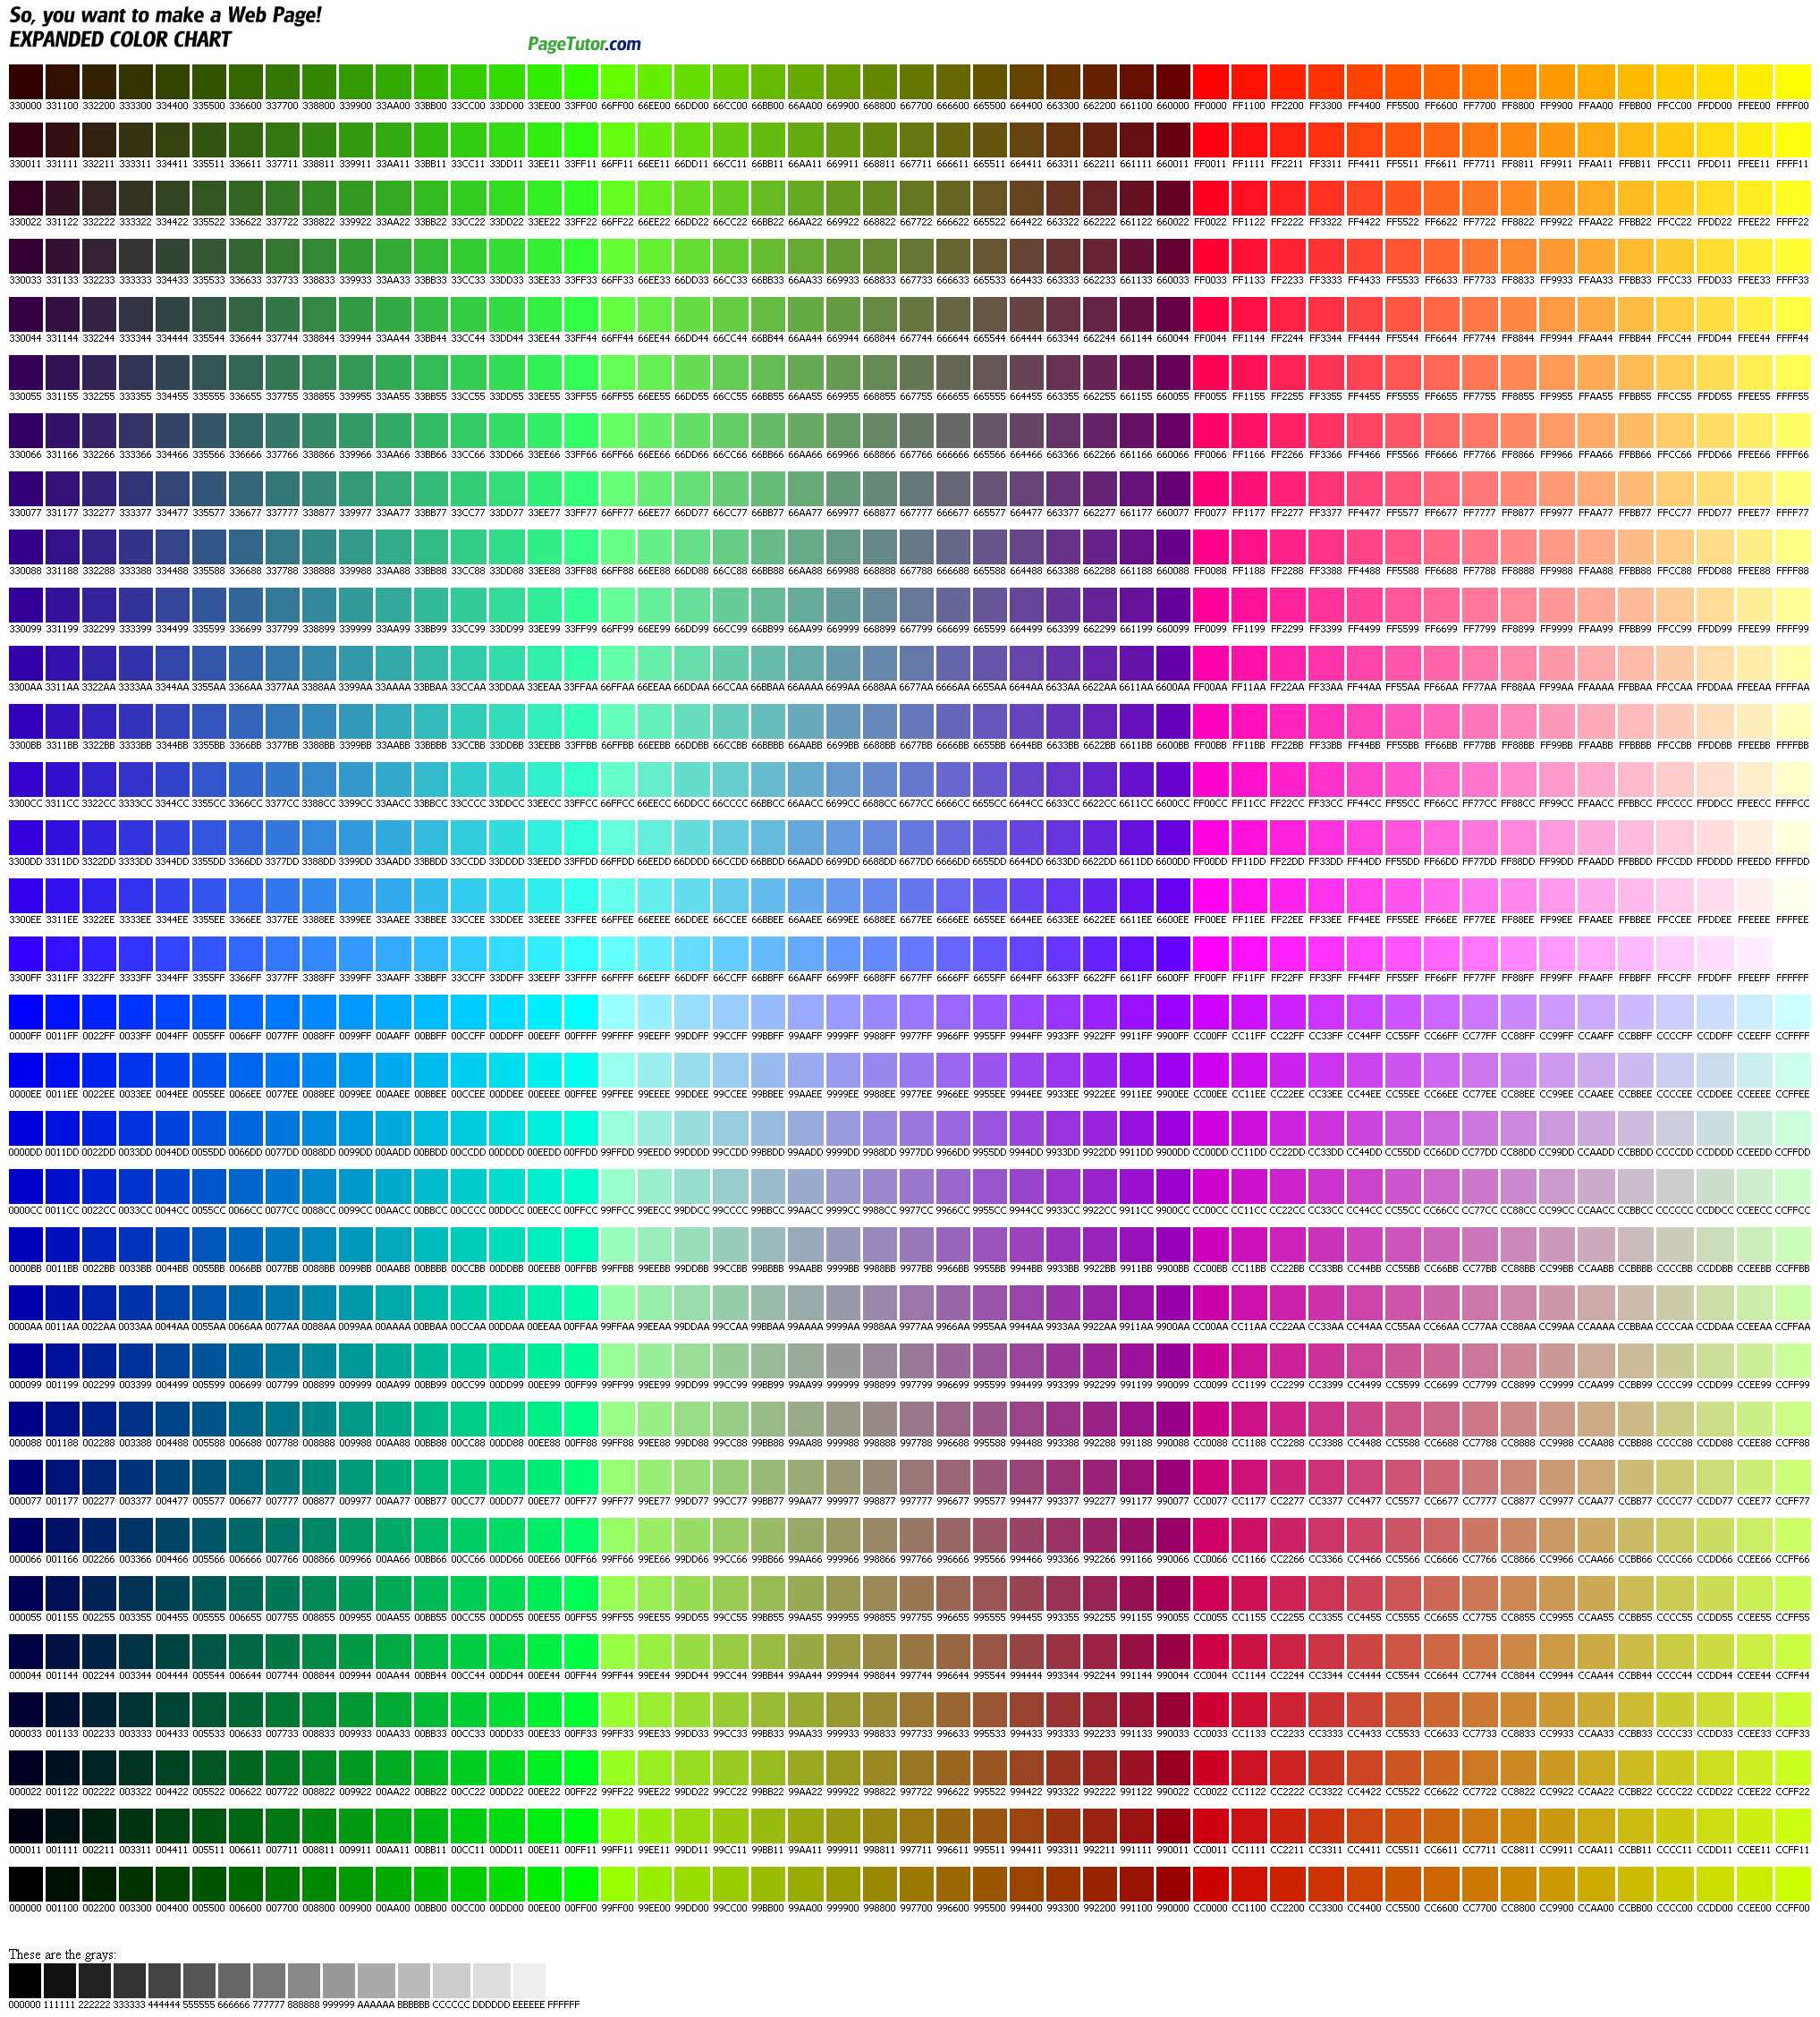
<font color="YOUR COLOUR HERE"> to control colour. Do note that in the tags, the spelling I use for the font colour is in US English, not UK English, even though I'd use that spelling otherwise. Regarding colours, though, you can just type in some straight away- things like black, white, yellow, red, blue, green, orange, pink, maroon, navy... but if you want a more specific shade, colour charts with hex codes are great for that!
<font size="YOUR FONT HERE"> to control font face. You could put in anything you want- but some fonts obviously won't be supported by all computers, so do be aware that even if it shows up for you, it might not for everyone. Most of the common fonts, though, like Arial, Verdana, Garamond, Impact, Courier New and all... those should work fine! (I think.)
But maybe that's not enough for you. Maybe you need... FIREWORKS, the code for which would be <font style="background-image: url(YOUR SPARKLY IMAGE URL HERE)">FIREWORKS</font>
Note what's going on here- inside the style we've got this background image, which provides us all the effects we could want. You should note, though, tha his isn't he only way to include background images to your text- the following code should work too.
<span style="background: url(YOUR SPARKLY IMAGE URL HERE)">FIREWORKS</span>
If you're looking for sparkly... stuff, this photobucket account and this LJ page should cover most things.
Now, you can actually start combining stuff, too. You don't need a new <font> tag for each element, you can just do the following, say-
<big><font color="pink" face="Times" style="background-image: url(http://gi69.photobucket.com/groups/i75/89KKG5U0K4/0000wz8p.gif)"><b><i><u>HI DOODY</b></i></u></font></big>
becomes
HI DOODY
Embedding and Linking Things
The one vaguely annoying thing about DW is that embedded images don't show up immediately in anonymous comments, only on the reply page to them. (This is actually the real reason why this journal exists, too, I'd have been happy to do the tutorials anonymously but for the fact that I couldn't link gifs in them...)
Either way, embedding images is pretty simple! Just place the link to whatever image you want between the quotes in a img tag, like so:
<img src="YOUR LINK GOES HERE">
Let's try it with this pic of a kitten.
<img src="http://i.imgur.com/7SHcD.png">
Here's what our code looks like, and...
Here's the kitten!
It's the same for gifs. One more thing, though- remember this post? Hover over the woopers for a bit, if you haven't yet. That's alt text for you! Now, the slightly annoying thing about both LJ and DW is that the 'alt' image attribute doesn't work very well in posts, by which I mean that if you try to include alt text this way, it just doesn't show up.
How'd it work there, then? Well, chances are the workaround was done by using 'title=""' instead. This is what the code would look like, for something like that-
<img src="YOUR LINK GOES HERE" title="YOUR WORDS GO HERE">
And in action:
Yaaaay.
As for videos, I'm pretty sure most people just use youtube, which makes embedding REALLY easy. Just hit the embed tag like so, copy and paste the code you see- BUT WAIT THERE'S MORE. If you hit the 'Options' menu under the video link, it'll open a secion so you can embed the video starting from whenever you want. And you can change the size, so it isn't too massive. Or so it IS even more massive, regardless of what you like. I'm partial to smaller videos myself, just because I think they're neater. Here's the code for the one from the image:
<iframe width="200" height="150" src="http://www.youtube.com/embed/v_eTyIDOsd8?rel=0" frameborder="0" allowfullscreen></iframe>
And the video:
Finally, and the simplest one of all- for linking things, just use <a href="YOUR LINK HERE">YOUR LINK TEXT HERE</a>. Check out any of the links in this post for the final effect.
That should cover most of the basics! I'm not done yet, though.

Dreamwidth Specific HTML
Here are a few more tags you should know.
<cut text=""> <cut> </cut>
<user name=> <user name= site=>
<raw-code> </raw code>
<blockquote> </blockquote>
These tags actually DID exist on LJ, but they've been changed somewhat here. <cut> replaces <lj-cut> (though the <lj cut> tag still works), and whatever words you want to go inside the cut text- if Read More isn't your thing- go inside the quote marks.
<user name=> works both for users and communities, like so-
<user name=sockymcsockerson> gives usfandomsecrets. Useful! But what if we want to link to something somewhere else? In that case, it's pretty simple too:
<user name=sockythemoogle site=livejournal.com> and <user name=fandomsecrets site=livejournal.com> give ussockythemoogle and
fandomsecrets respectively. Neat, huh? Or- well, I think it's neat, at least.
If you want to disable auto formatting- that is, things like Dreamwidth automatically adding lines for you between your paragraphs every time you hit enter, just use <raw-code>. Anything you write after that, text or code, will rely on your own formatting, where you can use <div> and <p> and <br> and <table>s with impunity. <div> creates a section, <p> a paragraph break, <br> a line break and <table>... makes tables.
Do take note, though! <br> tags work differently in DW from how they do in LJ, and it's safer to avoid using them- they kind of mess with entry formatting. Check out this post for an example of what I'm talking about- where the secrets end and before the failbar starts, there's a huge gap of blank space that really shouldn't be there. Sadly, the only way to avoid this for now is to try not to use <br> tags if there's an alternative.
And as for how I got everything indented? That's where <blockquote> and </blockquote> come in. Just put whatever text you want shoved a bit more to the right inside them.
Extra
In case you're wondering how I got all my <s and >s to show up, that'd be because I'm actually writing them out as '<' and '>' instead. What I'm doing is called using 'escaping' characters.
It's like if you want to make a comment just with an icon, you could type ' ', or if you'd rather make something with a heart, like ♥, '♥' works for that! The code for this starts with the '&' and ends at ';', so if you typed ♥hearts;, for instance, you'd end up with ♥hearts;.
Lastly, always remember to close your open tags! I cannot count the amount of times I've accidentally italicised several paragraphs when I just meant for a few words.
If anyone's got questions, just leave a comment! I know I didn't go into very much, and a lot of this should be fairly common knowledge already, but it might not be for everyone.
Also, if you're interested in any of my other tutorials, I've got a master list here! So far, I've covered changing the default site style, getting into roleplaying, marking 'new' comments in a post, using LJ juggler or LJ login for managing multiple accounts, as well as getting and claiming your OpenID and uploading icons onto it.
(Quick and unrelated note! For people who are using Firefox or Chrome, check SpeedyFox out. It's meant to improve the speed and functionality of your browser. It seems to work okay for me- I haven't noticed a drastic improvement, but it doesn't seem slower or anything, and other people who use it have reported really good boosts in performance, so it might be worth a try.)
(original here)